Ready to order? It all starts here!

Order A Die › or Request Estimate ›

Orders received by 10:00am EST will be processed that day if all information needed is received.

Eastern Time

Foil Stamping – Troubleshooting

Facing Floody Print
Finishers repeatedly face the challenge of producing a clean print without flooding (foil fill-in). The following suggestions could help solve this re-occurring problem.

Make-Ready
The correct make-ready preparation is a key step to your foil success. When stamping small type or an intricate design, hard make-ready board like epoxy glass board or phenolic board seems to work best. The result will be a crisp stamp without punch on the back side of the sheet.

Proper Foil
Make certain that you are using the proper foil. Foil is manufactured with different releases and adhesives for particular paper stock and applications. Working closely with your foil supplier will assure that you will find the best foil for fine-line stamping. Source-FSEA

Test It Out!
When stamping your foil to the substrates, make sure your foil adheres and bonds well. Here’s a simple test for adhesion: Put medium tack masking tape over the imprinted area, remove with a rapid jerking motion. If no pigment is visible on the tape, you have a good strong transfer and bond. Another test would be to moisten a cloth with rubbing alcohol, wipe the area back and forth at least five times without removing any pigment.

Solid Panel Tips

Smudge-Proofing
Often jobs may require stamping a solid panel of white foil on a dark background, e.g. duplex. Problems can arise if customers type on the white foil panel. Invariably, no matter what foil is used the typed letters will smudge or rub off. To overcome this, use a fine screened die for a white panel. This gives the same appearance as a solid panel and the smudging is eliminated. — Source FSEA

Trapped Gas
When foil stamping, gas can build up between the foil and the paper. If your image has many solid areas, the gas can get trapped and cause bubbles. To avoid this, we can use a fine screen that will not be noticeable, but will allow the gases to escape. If you think your job might require this, you can email us your file and we’ll discuss your project.

Paper Embossing & Debossing

Embossing & Debossing

Do you want to create a special effect? Why not try embossing or debossing? This procedure will create a raised or lowered image on paper and other substrates.

Embossing raises an image, while debossing lowers or presses down the image. Debossing is mainly used on leather, soft papers, or anywhere you want a depressed image. Blind embossing refers to an image raised with no printing.

Both methods are achieved by pressing your paper or substrate between a female die and a male counter on a controlled pressure press. Debossing can be achieved using a male die only.

Paper Embossing Embossing & Debossing

Paper Embossing – Make-Ready

Make-ready is the final stage where adjustments can be made prior to running your printing or finishing job. Following is a step-by-step outline of the make-ready process for embossing:

  • Lock the female die into the chase. (3M Bonding Film) can be used on presses without chases, and for some extremely large jobs.)
  • Apply double-coated tape to the back of the male counter die.
  • Apply a small amount of Vaseline or non-corrosive lotion to the female die.
  • Insert the counter die into the female die.
    Be sure your press is backed-off all the way.
  • Close the press slowly.

You are now ready to start embossing by applying the right amount of pressure. OWOSSO can supply dies with register pins on request. Register pins are used to register the male die to the female die, not to the printed piece.

How it all works

Paper Embossing – Paper Stock Selection Guide

For foil stamping projects, your choice of paper stock may also affect the final foil appearance. Papers such as 25% cotton, 100% cotton, vellum, laid stock and other porous papers will dull certain foils. The solution is to communicate to your stamping supplier the stock you’ve selected so they can order a metallic foil formulated for that specific stock. Check with your printer to determine the dyne count (surface tension) of a sheet when laminated. The dyne count should be higher than 40 for the sheet to be foil stamped.

  • Recycled Stock:  As the use of recycled stocks has become quite common, there are some considerations worthy of mention. Due to high compression levels of recycled fiber, stamping large areas requires significantly more tonnage, or pressure, applied by the stamping press compared to virgin fiber stock. Because of this fact, often a foil will not appear mirror-like, and fine lettering or detail presents a greater challenge because of compression inconsistencies. In addition, because of the abrasive, fibrous nature of these stocks, die life is shortened often resulting in loss of detail or additional cost.


  • Dark Colored Stock: As opacity levels vary with different foil pigments, resulting colors and contrast may not be acceptable when applied to dark stocks. This is not only true of translucent pastel and light foils, but with high gloss pigments as well. Check with your stamping supplier to achieve best results.

Paper Selection Guide for Foil Stamping

Paper Embossing – Counter Dies

Counter dies, also referred to as male dies, can be made from several materials: poured fiberglass, etched magnesium plates, embossing compound, or layered counterboard. Brass counter dies are poured fiberglass.

Poured Fiberglass
If holding as much artwork detail as possible is imperative to your job, poured fiberglass counters are the ones to use. The material used for poured fiberglass counters is extremely hard, specifically designed for crisp, clean stamping applications and for long-running jobs.

Magnesium Counter Dies
To ensure a crisply detailed raised image, it is important to etch the female die enough to accommodate a male counter die yet also leave spare room for the weight of the paper. The counter die is etched several thousandths of an inch deeper than the female die. When embossing, this allows the counter die to bottom-out without disturbing the texture of the surrounding paper. See the paper stock selection guide for embossing for additional details.

OWOSSO customers are reporting great results and increased simplicity of make-ready using poured fiberglass and magnesium etched counters for both cold and hot embossing.

Embossing Compound
If your image has a lot of extremely fine detail, your best bet might be to produce your own counter die on your press.

Pressed into Layered Counterboard
Layered counterboard is a material that can be found from sources that carry engravers materials. It is a board made up of several layers – 36 or more. This is another method of creating your own counter die on your press.

Paper Embossing – Artwork Recommendations

Artwork is critical to the success of embossing and debossing. Some types of art are not as suitable for either process on heavy, textured stock. See the Paper Selection Guide for more details on choosing the paper that is best for your project.

Example 1=Bold & Thin Lines Combined

Thinner copy will not emboss as deeply as bold artwork. Combining both thin and bold lines in the same piece will yield uneven results.

Example 2=Screens and Fine Patterns

Example 2=Screens and Fine Patterns

Avoid images with a fine pattern in them such as a screen. These do not reproduce crisply as an embossing or debossing and usually look unintentional.

If you have questions about artwork, please feel free to call us anytime for help. Remember that checking with us before starting a job can save costly mistakes, time and money.

Paper Embossing – What Type of Metal?

Several important factors combine to determine the choice between brass, magnesium and copper for creating the best results with your embossing and debossing dies. No single factor should be used alone to make the decision. Since all of the factors listed below interact with one another, their cumulative effect should be considered. Experience will help you make the best material choice, and your printer, press operator, and photoengraver can all provide valuable assistance.

Choosing magnesium, when appropriate, can yield cost savings for your customer and speed up turn-around, without sacrificing quality. Brass dies are hand sculpted and machined therefore making them the most expensive of the three metal choices. Brass dies are the most durable and since they can be repaired, the life of the die is almost endless. Interpretation of the artwork is only possible with brass dies, including shapes, textures and edges.

Copper is a relatively harder metal used for the same applications as magnesium dies. If your job requires a more durable metal, copper is the best selection. Please consider the following:

  • Surface Area Pressure
  • Artwork Designs
  • Length of Press Run
  • Substrates
  • Handling and Maintenance
  • Experienced Craftsmanship

Surface Area Pressure
The amount of pressure required to achieve the best results depends on the size of the surface area being embossed or debossed. Equal embossing and debossing results for a one-inch square surface area require less pressure than that needed for five square inches. Depending on the other factors involved, magnesium is best used on smaller areas with smoother papers while copper is beneficial for larger areas and more heavily textured papers, and extremely long runs. Brass is generally used for combination foil and embossing dies.

Artwork Designs
Durability of your embossing and debossing dies under pressure should suit your artwork design. Relatively more pressure is needed for the best results in bold and uniformly spaced designs. For example, a solid square requires more pressure than an outlined square of the same size. Fine detail and unevenly distributed artwork designs require relatively less pressure and can be readily achieved with magnesium. However, bold and evenly spaced artwork to be printed in long runs may require pressure that copper can withstand best.

Length of Press Run
Generally longer press runs can cause erosion on embossing and debossing dies. For this reason, copper dies are recommended for long runs. However, this is a relative guideline since many factors determine what is even considered a long run. For example, heat is a factor that can reduce the durability of metal. Magnesium has achieved runs in the upper tens of thousands. If you are using high heat and have a long run with your embossing and debossing, brass or copper might be better choices.

Substrates
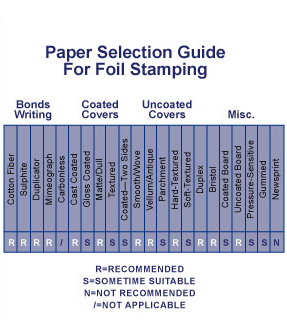
Is your paper stock recycled, heavily textured, coated, or uncoated? Generally, the tougher the paper stock, the more durable the metal for your die should be. Smoother paper stocks don’t wear as much on your embossing and debossing dies, and magnesium can yield excellent results. Copper dies may be worth the extra cost when using heavily textured papers and for longer runs.

Handling and Maintenance
Press tolerances should be checked periodically. When adjusted accordingly, you can considerably increase the life of your embossing and debossing dies. Also, be careful in make-ready. Scratching and dents can be avoided with just a little attention. With proper handling in all these areas, you will get more from your die. A good way to store your magnesium dies, is to first coat them with a little cooking spray or oil such as Pam™. When stored and handled properly you may find you are using magnesium again and again.

You’ll offer your customers the best cost, speed, and quality, when you balance all of the above factors. Paper houses have sample departments – use them to test your dies on different stock. Artwork designers should also consult with their printers and finishers concerning stock choices and designs. When printers and finishers know ahead of time what they will be working with, it is much easier for them to evaluate the best metal for your embossing and debossing job.

OWOSSO welcomes any technical questions or inquiries. Just email your job specifics including artwork design, length of run, paper stock, and temperature and we can help!

Experienced Craftsmanship
Since 1949, OWOSSO continues to set the industry standard for both craftsmanship and service. Our experienced staff has a thorough knowledge of the substrates, the die-making process, and the best production techniques that produce the highest quality dies.

Credit Application

Credit Terms:

OWOSSO offers the convenience of Visa, Mastercard, Discover or American Express for automatic billing!

Payment on new accounts may be made by either credit card, C.O.D. or advance check. Open accounts are available to established businesses once full credit has been approved.

Open account terms NET 15 days. A 1.5% finance charge per month (18% APR) will begin accruing after 15 days. Orders for accounts 60 days past due will be shipped C.O.D.

Click here to download our Credit Application

OWOSSO forms are in Adobe PDF format which will require Adobe Acrobat Reader. These forms are fillable and printable. Click the Adobe link to download the latest version. To save a PDF document from the OWOSSO website to a computer, click on the save icon in the upper left corner of the PDF document.

Guidelines for Electronic Ordering

By following the tips included in this section you can enjoy cleaner, crisper images on your dies.

See the following links for more details:

If it all still seems a little intimidating, call us! We are here to help and we want to make the entire ordering and production process simple for you!

Give us a call at 1-800-444-5552 or email us!


Software Program Compatibility—Copper and Magnesium Dies

To send your order electronically to OWOSSO you can use any of the following programs
to create your files:

  • CDR– Corel Draw
  • AI– Adobe Illustrator
  • FH– Freehand
  • PM– Pagemaker
  • QXD– Quark
  • IDD– In Design
  • PSD– Photoshop
  • EPS– Encapsulated Postscript
  • PDF– Portable Document File
  • JPG– Jpeg, only in 100% black and white, 600 DP (Jpeg’s not acceptable for certain applications like hot stamping, embossing, soap & pottery stamps)
  • TIF– Tiff bitmap, only in 100% black and white, 600 DPI
  • Microsoft Word and Excel files need to be saved as a PDF. We do not accept MS Word or Excel files.

Here are a few important software tips to remember:

  • When using PageMaker or Quark Express you need to also send OWOSSO your fonts. No big deal! Just find that font folder on your hard drive, make a copy of that folder, and put it in the same folder that will hold the file you are sending us.
  • With Corel Draw, Illustrator or Freehand you do not need to send fonts, however you need to change your type into “outlines or paths”.
  • Don’t forget to always include your placed images unless they have been embedded in the file.
  • When setting type, avoid using the control palette to create bold or italic fonts. It may print okay on your computer’s printer, but it will not translate on our postscript imagesetters. PDFs created in this manner will also default. Yikes!!
  • Remember — always avoid typesetting in Photoshop. It’s a great program but does not produce clean, crisp type.

Software Program Compatibility—Brass Dies

All Brass dies need to be vector based. Preferred files are:

  • CDR– Corel Draw
  • AI– Adobe Illustrator
  • EPS– Encapsulated Postscript
  • IDD– In Design
  • Colors may be used to show the different levels.

Scanning Instructions and Recommendations

Although original files are preferred, high resolution tiffs are also acceptable. Scanning poor copy with ragged edges will produce a file with, you guessed it, ragged edges. Printing it to your ink jet or laser printer may not tell you the whole story on the quality of the file.

At OWOSSO, we use computer-to-plate technology. It is not as forgiving as your printer. Every little jagged line will look like a jagged line. Some good rules for scanning include:

  • Scan line art at 600 to 1200 dpi and save as a “bitmap tiff” to remove the screens around the edges of the image.
  • Scan halftones at a dpi of 2 1/2 times the linescreen you want to print at. Save the file as a “grayscale tiff”.
  • Crop the image down to just what you need to send to us. Scanning a small piece of art on an 8 1/2 X 11 page will be a huge file because all of the empty page around the image will be part of the scan and will be represented by pixels. The more pixels, the bigger the file. Monstrous files go nowhere via e-mail.
  • Refuse Jpegs and Gifs from your customers. They are great for viewing on your computer screen but are rarely high enough quality for printing.

The Importance of Compressing Your Files

Compressing your files will help avoid the dreaded call from OWOSSO’s Imaging Department letting you know that we were not able to work with your file because it didn’t come through the internet safely. Compressing your file to a “ZIP” file is a better way to get your files across the types of server/computer platforms. Your PC & MAC’s have this compression utility built-in (Win 7 or newer and Mac’s OS10 versions), allowing you to compress your files/folders safely.

Right “clicking” your file (where you have saved it) on a Mac or PC, you’ll have a little window open and one of the options will be “compressing” your file to a “ZIP” file. Windows and Mac’s word this a little differently, but you’ll figure it out.

Another advantage to compressing your files is you can add more files to you order than attached file limit of 10, as long as your “ZIP” file isn’t larger than 50mb.

Shipping

For dependability, we recommend UPS or FedEx for the shipping of your products. Both companies offer very detailed websites explaining the various shipping options available.

When your product is complete, OWOSSO will ship your order per your instructions. If no specific shipping instructions are provided, we will ship your order by UPS Ground

Shipping charges plus a handling charge will be added to your invoice. Handling charge is 1% of die order with a minimum of $1.00, maximum of $25.00.

Categories