Tech Tips
This section of our website is designed to keep you informed of helpful hints that we’ve learned throughout the years. Our experienced staff is eager to share their expertise with you.
Here you’ll find an in-depth look at three key processes — Paper Embossing, Foil Stamping, and Thermal Kiss-Cutting, including specific details about:
- How the Process Works
- Metal Specifications
- Make-Ready
- Storage Recommendations
- Troubleshooting
If you have a particular question that isn’t answered in Tech Tips, please give us a call at
(800-444-5552), or e-mail us. We’re here to help!
Click here to download a Heat Expansion Calculator
Magnesium Die & Plate Storage
Thoroughly clean your magnesium die—most soaps or detergents can be safely used on the die. Be sure all chemicals are removed from the die. Then carefully coat the die with a light oil—a nonstick cooking spray works. Once the die is completely dry, tightly wrap the magnesium plate or die in plastic wrap or a resealable bag. The priority is to remove or reduce oxygen from the die, as oxygen contains moisture which will start the oxidizing process.
If you don’t find the answer to your specific question here, please do not hesitate to contact our Customer Service Specialists at OWOSSO by phone at 1-800-444-5552 or by e-mail.
Thermal Kiss-Cutting
There’s just nothing like it! From fleet markings to self-adhesive alphabets, from delicate pin stripings to splattered-effect decals, from kid’s stickers to safety signage, thermal kiss-cutting offers a world of possibilities for the graphic arts industry. Also known as face cutting, or just thermal die cutting, this technique gives designers, screenprinters, and die cutters the ability to create products with complex designs and intricate details unachievable with conventional steel-rule cutting dies.
Within this section of Tech Tips you’ll find a complete overview of magnesium thermal dies for cutting pressure-sensitive vinyls, including:
- Why thermal die use is increasing
- How thermal dies work
- How these dies are made
- Some important considerations for designing and ordering dies
- Cutting techniques
- Die maintenance and storage recommendations
Our goal is to help you achieve the best results from your thermal dies.
If you don’t find the answer to your specific question here, please do not hesitate to contact our Customer Service Specialists at OWOSSO by phone at 1-800-444-5552 or by e-mail.
Thermal Kiss-Cutting – Why Thermal Dies?
Thermal Dies Offer Easy-to-Use Versatility
The market for thermal dies continues to grow both because they are easy to use, and the vinyls that thermal dies can cut have a wide range of uses. New pressure-sensitive vinyls are available for a broad spectrum of applications, including indoors, outdoors, underwater, low-temperature, and reflective, just to name a few. Vinyls truly have an endless number of product possibilities — from decals to pin striping to signage and many more.
Thermal dies can be quickly reproduced from computer files or file-line negatives. Because photoengravings are not made using labor-intensive manual tooling, thermal dies can be produced with fast turnaround, normally same-day, and lower costs.
Still, despite all the advantages of thermal dies, for some jobs they are just inappropriate. For instance magnesium dies won’t cut through paper or other materials that contain fibers.
Thermal Kiss-Cutting – How It Works
“Cutting” might be a misleading word. Melting is actually more accurate. In order to melt the face of pressure-sensitive vinyls, thermal dies use a combination of three factors: heat, dwell time, and pressure. However, thermal dies just “kiss” the vinyl, leaving the paper liner, or carrier, intact. Please see Diagram #1.
Of course, different combinations of heat, dwell, and pressure are necessary for crisp, sharp “cutting” of the various types of vinyls. With regards to heat, it is always best to start with lower temperatures, and work your way up gradually. For four-mil vinyl, your press temperature should be set at 275°F, and then gradually increased until a clean cut is achieved. Special attention has to be given when using layered screen printing and UV coatings. Higher temperatures are needed for reflective and screen-printed materials, ranging as high as 350°F.
Dwell times will vary according to the material and heat that you are using. One-half to two seconds is the norm for dwell time. Some people cut their dwell time down by using higher temperatures, using past experience as their guide.
The final factor, pressure, is greatly affected by the configuration of your die. Intricate details require relatively more pressure than large, open areas. Also, you may want to adjust the type of counter board underlay that is used depending on the image being cut. Commonly used counter board underlays are posterboard, chipboard, and polyurethane.
Keeping these three factors — heat, dwell, and pressure — in check will reduce the build-up of melted vinyl on the shoulders of your die, and give you a more stress-free cutting experience. It’s important to remember that it is the combination of these three factors that allows thermal dies to melt or “kiss-cut” vinyls.
Thermal Kiss-Cutting – What is it?
Profile of a Good Thermal Kiss-Cut Die
Magnesium thermal dies are typically produced in two thicknesses. The most commonly used thickness for four-poster presses is 11 point (.153″). Then there is 18 point (.250″), typically used on clamshell presses. The size of thermal dies is only limited by your press size. Using our oversize die etching machine, OWOSSO can etch cutting images ranging from a single square inch to 10 feet long by 30 inches wide.
Obviously, the goal of using a thermal die is to precisely cut your customer’s artwork. It’s vital in matching this artwork to remember that heat (the thermal part of your die) expands all metals–including magnesium.
Magnesium expands approximately .25% at 290°F and .5% at 350°F. Higher temperatures will cause greater expansion. The Heat Expansion formula in Diagram #2 will help you, especially with critical registration.
If your job requires close registration, run a sample under actual conditions so that printing can be matched to the impression of the die registration. You can use carbon paper between the die and the counterboard underlay to create an impression of the expanded die.
Photoengraving demands craftsmanship. After the image is developed onto highly polished magnesium, every fine detail, every inch, must be inspected for broken lines, pinholes, or missing details. The magnesium is then etched in acid baths. Diluted nitric acid containing solvents and water is splashed against the image surface of the magnesium, etching away everything except the desired line image. The process has to be monitored for constantly changing acid concentrations, temperatures, and humidity, which all fluctuate depending on the amount of open areas of the image being etched.
All these factors influence the depth, shoulder angle, and cutting-edge width of a thermal die; whether it’s a steep, sharp shoulder or sloping and wide.
The cutting edge for 2 mil to 4 mil vinyl should have a surface of .002″ to .004″, depending on the boldness of the image, or if imprinted vinyl is being used. The regular etching depth is between .060″-.075″ for basic cutting needs. More depth can be achieved for special cutting requirements. Please note that only the first .010-.012 inches will actually do the cutting of your vinyl. The remainder of the die’s depth will help prevent scorching of your substrate and build up of melted vinyls. It will also help avoid slow downs in cutting speed, and will keep the vinyl away from the heated die.
We can help you get the best results if we know what you’re cutting. We can etch the dies deeper, or with steeper shoulders if necessary. Some examples of materials needing special attention are: preprinted, UV coated, static cling, and reflective vinyl.
Magnesium expands approximately .25% at 290°F and .5% at 350°F. Higher temperatures will cause greater expansion.
Thermal Kiss-Cutting – Make Ready
Cutting With Your Hot Kiss
Properly mounted dies on a well-maintained press hardly require make-ready since the surface of the die is of even height. An even counter board underlay, such as poster board, chip board or polyurethane will help in cutting, and it will also protect the edges of the die from dulling or smashing.
To prevent the melted vinyl from sticking and building up on die shoulders, use a release agent such as OWOSSO Release coating. This is an advanced Teflon-like release coating, which has better releasing properties than older spray-on types. Release coatings are most helpful on fine detail and difficult jobs. Even with the newer release agents you need to keep your heat settings in check. Too much heat will result in burned material, raised ridges on part edges, and, in some cases, cut parts that get heat-welded to their backing sheets.
By now you’re probably wondering how many cutting impressions are possible with magnesium dies. Just as for steel rule dies, the material substrate and temperature being used contribute to the longevity of a die. For reflective vinyl with beads, a die might only last for 300 to 500 strikes. Contrast this with a report we’ve received from Houston about a company getting over a million impressions, on 2-mil vinyl — and they’re still using that same die. Trust us, this isn’t just another tall tale from Texas!
Putting bearers around the die can prevent damage from too much pressure. When dies are mounted, they should be centered on the press plate as much as possible, so that even pressure is applied. If a die design has images that are lop-sided, off to one side, this creates an unbalanced load on the press. For more uniform cutting, place pressure bearers on the open side to compensate.
Please give OWOSSO a call when you are cutting unusual printed material or materials with heavy UV coatings. We can point out where you may experience trouble, and it will help you get a clean, sharp cut.
Thermal Kiss-Cutting – Storage
Thermal Die Maintenance
When finished cutting, it is best to remove the die from the press while it is still hot, gently prying it off (the hotter the die is, the easier it will come off). Take care not to let it fall face down. Before the die cools, use a natural-fiber brush to scrub off any residues. We recommend a tampico fiber brush, which can be found at most hardware stores. Dies are easier to clean while still at cutting temperature. To avoid magnesium corrosion, coat your die with an oil such as Pam™ cooking spray. Of course, this prevention is not necessary if your dies are already coated with OWOSSO Release Coating. Dies last longer when stored in a low-moisture, chemical-free atmosphere.
Here are just a few more tips to remember: Magnesium is a soft metal; it is almost impossible to repair. A good method for storing thermal dies is to drill a hole at one end for hanging. Hanging your dies avoids warping, but you can just as effectively stack your dies by taping a protective sheet of chipboard over the face of the die. The die will stay straight and not be damaged when stacked. Although the cutting edges are not sharp, they need to be protected.
So Go Get a Hot Kiss!
Following these general guidelines will help make kiss-cutting a joy, rather than a job. Don’t forget OWOSSO is always available for troubleshooting and free estimates. Vinyl manufacturers are also a great source for questions. And remember — there’s nothing like a “hot kiss!”
What is Foil Stamping?
Foil stamping is a cost-effective, eye-catching form of heat transfer printing. Using a heated metal die, color pigments are stamped onto paper and other substrates. It is truly a value-added process. The cost of adding a color with foil stamping is often less expensive than adding an additional color in ink. To add a decorative touch to letterhead, envelopes, book covers, plastic vinyl or other substrates, foil stamping is the way to go!
Environmentally Friendly
Foil stamping is also a more environmentally friendly technique because it is a dry process. In other words, there are no solvents, inks, or vapors associated with the process. Foil stamped paper is also recyclable.
Foil Stamping – A Simple Process
A Simple Process
The basic concept behind hot foil stamping is simple. A die is mounted and heated. After the foil is positioned above the material to be imprinted, a combination of heat, dwell time and pressure compresses the paper fibers, covering it with any of a variety of foils. Foil stamping presses come in sizes from small, hand operated table models (1″ x 3″) to over 30″. Whether small or large, three facets of operation come into play:
- Heat
- Pressure
- Dwell Time
Foil Stamping – The Substrates
The Substrates
Ask Us!
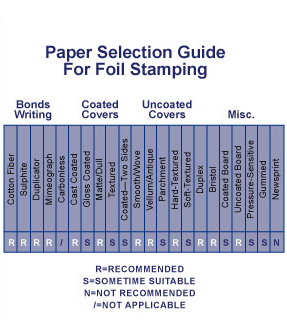
Understanding the foil stamping process and printing surfaces are the keys to avoiding trouble. It is a good policy to discuss the job in question with foil experts and with OWOSSO! Use the paper selection guide included here as a reference.
Substrates: Papers, Plastics, etc.
While foil stamping is an extremely versatile application, please be aware that not all substrates will readily receive and adhere to all foils. Some foils are designed for specific substrates. Heavily-inked or heavily-coated sheets are not porous enough for some foils to adhere properly. Plastic coatings and varnishes can prevent successful foil transfer to the paper, causing blisters. Consult your foil expert — there are a variety of solutions available.
Inks
Wax-free inks and varnishes are recommended for foil stamping. If you do use a coated stock, tests should be made prior to the production run. Stamping surfaces with large solid areas with fine type may cause considerable trouble, due to the fact that solids need more pressure and dwell time, whereas bolder type needs less pressure and dwell. Good make-ready is a must. Sometimes splitting runs achieves the best results.
Foil Stamping – What Type of Metal?
Several important factors combine to determine the choice between brass, magnesium and copper for creating the best results with your foil stamping, embossing, and debossing dies. No single factor should be used alone to make the decision. Since all of the factors listed below interact with one another, their cumulative effect should be considered. Experience will help you make the best material choice, and your printer, press operator, and photoengraver can all provide valuable assistance.
Choosing magnesium, when appropriate, can yield cost savings for your customer and speed up turn-around, without sacrificing quality.
Brass dies are hand sculpted and machined therefore making them the most expensive of the three metal choices. Brass dies are the most durable and since they can be repaired, the life of the die is almost endless. Interpretation of the artwork is only possible with brass dies, including shapes, textures and edges.
Copper is a relatively harder metal used for the same applications as magnesium dies. If your job requires a more durable metal, copper is the best selection. Please consider the following:
- Surface Area Pressure
- Artwork Designs
- Length of Press Run
- Substrates
- Handling and Maintenance
- Experienced Craftsmanship
Surface Area of Pressure
The amount of pressure required to achieve the best results depends on the size of the surface area being foil stamped, embossed or debossed. Equal foil stamping, embossing and debossing results for a one-inch square surface area require less pressure than that needed for five square inches. Depending on the other factors involved, magnesium is best used on smaller areas with smoother papers while copper is beneficial for larger areas, more heavily textured papers, and extremely long runs. Brass is generally used for combination foil and embossing dies.
Artwork Designs
Durability of your foil stamping, embossing and debossing dies under pressure should suit your artwork design. Relatively more pressure is needed for the best results in bold and uniformly spaced designs. For example, a solid square requires more pressure than an outlined square of the same size. Fine detail and unevenly distributed artwork designs require relatively less pressure and can be readily achieved with magnesium. However, bold and evenly spaced artwork to be printed in long runs may require pressure that copper can withstand best.
Length of Press Run
Generally longer press runs can cause erosion on magnesium foil stamping, embossing and debossing dies. For this reason, copper dies are recommended for long runs. However this is a relative guideline since many factors determine what is even considered a long run. For example, heat is a factor that can reduce the durability of metal. Magnesium has achieved runs in the upper tens of thousands. If you are using high heat and have a long run with your foil stamping, embossing and debossing, brass or copper might be better choices.
Substrates
Is your paper stock recycled, heavily textured, coated, or uncoated? Generally, the tougher the paper stock, the more durable the metal for your die should be. Smoother paper stocks don’t wear as much on your foil stamping, embossing and debossing dies, and magnesium can yield excellent results. Copper dies may be worth the extra cost when using heavily textured papers and for longer runs.
Handling & Maintenance
Press tolerances should be checked periodically. When adjusted accordingly, you can considerably increase the life of your foil stamping, embossing and debossing dies. Also, be careful in make-ready. Scratching and dents can be avoided with just a little attention. With proper handling in all of these areas, you will get more from your die. A good way to store your magnesium dies is to first coat them with a little cooking spray or oil such as Pam.™ When stored and handled properly you may find you are using magnesium again and again.
You’ll offer your customers the best cost, speed, and quality, when you balance all of the above factors. Paper houses have sample departments – use them to test your dies on different stock. Artwork designers should also consult with printers and finishers concerning stock choices and designs. When printers and finishers know ahead of time what they will be working with, it is much easier for them to evaluate the best metal for your foil stamping, embossing or debossing job.
Experienced Craftsmanship
OWOSSO welcomes any technical questions or inquiries. Just fax (989-723-5399) or email your job specifics including artwork design, length of run, paper stock, and temperature and we can help!
Since 1949, OWOSSO continues to set the industry standard for both craftsmanship and service. Our experienced staff has a thorough knowledge of the substrates, the die-making process, and the best production techniques that produce the highest quality dies.
Foil Stamping – Troubleshooting
Facing Floody Print
Finishers repeatedly face the challenge of producing a clean print without flooding (foil fill-in). The following suggestions could help solve this re-occurring problem.
Make-Ready
The correct make-ready preparation is a key step to your foil success. When stamping small type or an intricate design, hard make-ready board like epoxy glass board or phenolic board seems to work best. The result will be a crisp stamp without punch on the back side of the sheet.
Proper Foil
Make certain that you are using the proper foil. Foil is manufactured with different releases and adhesives for particular paper stock and applications. Working closely with your foil supplier will assure that you will find the best foil for fine-line stamping. Source-FSEA
Test It Out!
When stamping your foil to the substrates, make sure your foil adheres and bonds well. Here’s a simple test for adhesion: Put medium tack masking tape over the imprinted area, remove with a rapid jerking motion. If no pigment is visible on the tape, you have a good strong transfer and bond. Another test would be to moisten a cloth with rubbing alcohol, wipe the area back and forth at least five times without removing any pigment.
Solid Panel Tips
Smudge-Proofing
Often jobs may require stamping a solid panel of white foil on a dark background, e.g. duplex. Problems can arise if customers type on the white foil panel. Invariably, no matter what foil is used the typed letters will smudge or rub off. To overcome this, use a fine screened die for a white panel. This gives the same appearance as a solid panel and the smudging is eliminated. — Source FSEA
Trapped Gas
When foil stamping, gas can build up between the foil and the paper. If your image has many solid areas, the gas can get trapped and cause bubbles. To avoid this, we can use a fine screen that will not be noticeable, but will allow the gases to escape. If you think your job might require this, you can email us your file and we’ll discuss your project.
Paper Embossing & Debossing
Embossing & Debossing
Do you want to create a special effect? Why not try embossing or debossing? This procedure will create a raised or lowered image on paper and other substrates.
Embossing raises an image, while debossing lowers or presses down the image. Debossing is mainly used on leather, soft papers, or anywhere you want a depressed image. Blind embossing refers to an image raised with no printing.
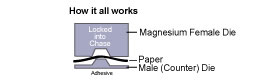
Both methods are achieved by pressing your paper or substrate between a female die and a male counter on a controlled pressure press. Debossing can be achieved using a male die only.
Paper Embossing – Make-Ready
Make-ready is the final stage where adjustments can be made prior to running your printing or finishing job. Following is a step-by-step outline of the make-ready process for embossing:
- Lock the female die into the chase. (3M Bonding Film) can be used on presses without chases, and for some extremely large jobs.)
- Apply double-coated tape to the back of the male counter die.
- Apply a small amount of Vaseline or non-corrosive lotion to the female die.
- Insert the counter die into the female die.
Be sure your press is backed-off all the way. - Close the press slowly.
You are now ready to start embossing by applying the right amount of pressure. OWOSSO can supply dies with register pins on request. Register pins are used to register the male die to the female die, not to the printed piece.
Paper Embossing – Paper Stock Selection Guide
For foil stamping projects, your choice of paper stock may also affect the final foil appearance. Papers such as 25% cotton, 100% cotton, vellum, laid stock and other porous papers will dull certain foils. The solution is to communicate to your stamping supplier the stock you’ve selected so they can order a metallic foil formulated for that specific stock. Check with your printer to determine the dyne count (surface tension) of a sheet when laminated. The dyne count should be higher than 40 for the sheet to be foil stamped.
- Recycled Stock: As the use of recycled stocks has become quite common, there are some considerations worthy of mention. Due to high compression levels of recycled fiber, stamping large areas requires significantly more tonnage, or pressure, applied by the stamping press compared to virgin fiber stock. Because of this fact, often a foil will not appear mirror-like, and fine lettering or detail presents a greater challenge because of compression inconsistencies. In addition, because of the abrasive, fibrous nature of these stocks, die life is shortened often resulting in loss of detail or additional cost.
- Dark Colored Stock: As opacity levels vary with different foil pigments, resulting colors and contrast may not be acceptable when applied to dark stocks. This is not only true of translucent pastel and light foils, but with high gloss pigments as well. Check with your stamping supplier to achieve best results.
Paper Embossing – Counter Dies
Counter dies, also referred to as male dies, can be made from several materials: poured fiberglass, etched magnesium plates, embossing compound, or layered counterboard. Brass counter dies are poured fiberglass.
Poured Fiberglass
If holding as much artwork detail as possible is imperative to your job, poured fiberglass counters are the ones to use. The material used for poured fiberglass counters is extremely hard, specifically designed for crisp, clean stamping applications and for long-running jobs.
Magnesium Counter Dies
To ensure a crisply detailed raised image, it is important to etch the female die enough to accommodate a male counter die yet also leave spare room for the weight of the paper. The counter die is etched several thousandths of an inch deeper than the female die. When embossing, this allows the counter die to bottom-out without disturbing the texture of the surrounding paper. See the paper stock selection guide for embossing for additional details.
OWOSSO customers are reporting great results and increased simplicity of make-ready using poured fiberglass and magnesium etched counters for both cold and hot embossing.
Embossing Compound
If your image has a lot of extremely fine detail, your best bet might be to produce your own counter die on your press.
Pressed into Layered Counterboard
Layered counterboard is a material that can be found from sources that carry engravers materials. It is a board made up of several layers – 36 or more. This is another method of creating your own counter die on your press.
Paper Embossing – Artwork Recommendations
Artwork is critical to the success of embossing and debossing. Some types of art are not as suitable for either process on heavy, textured stock. See the Paper Selection Guide for more details on choosing the paper that is best for your project.
Example 1=Bold & Thin Lines Combined
Thinner copy will not emboss as deeply as bold artwork. Combining both thin and bold lines in the same piece will yield uneven results.
Example 2=Screens and Fine Patterns

Avoid images with a fine pattern in them such as a screen. These do not reproduce crisply as an embossing or debossing and usually look unintentional.
If you have questions about artwork, please feel free to call us anytime for help. Remember that checking with us before starting a job can save costly mistakes, time and money.
Paper Embossing – What Type of Metal?
Several important factors combine to determine the choice between brass, magnesium and copper for creating the best results with your embossing and debossing dies. No single factor should be used alone to make the decision. Since all of the factors listed below interact with one another, their cumulative effect should be considered. Experience will help you make the best material choice, and your printer, press operator, and photoengraver can all provide valuable assistance.
Choosing magnesium, when appropriate, can yield cost savings for your customer and speed up turn-around, without sacrificing quality. Brass dies are hand sculpted and machined therefore making them the most expensive of the three metal choices. Brass dies are the most durable and since they can be repaired, the life of the die is almost endless. Interpretation of the artwork is only possible with brass dies, including shapes, textures and edges.
Copper is a relatively harder metal used for the same applications as magnesium dies. If your job requires a more durable metal, copper is the best selection. Please consider the following:
- Surface Area Pressure
- Artwork Designs
- Length of Press Run
- Substrates
- Handling and Maintenance
- Experienced Craftsmanship
Surface Area Pressure
The amount of pressure required to achieve the best results depends on the size of the surface area being embossed or debossed. Equal embossing and debossing results for a one-inch square surface area require less pressure than that needed for five square inches. Depending on the other factors involved, magnesium is best used on smaller areas with smoother papers while copper is beneficial for larger areas and more heavily textured papers, and extremely long runs. Brass is generally used for combination foil and embossing dies.
Artwork Designs
Durability of your embossing and debossing dies under pressure should suit your artwork design. Relatively more pressure is needed for the best results in bold and uniformly spaced designs. For example, a solid square requires more pressure than an outlined square of the same size. Fine detail and unevenly distributed artwork designs require relatively less pressure and can be readily achieved with magnesium. However, bold and evenly spaced artwork to be printed in long runs may require pressure that copper can withstand best.
Length of Press Run
Generally longer press runs can cause erosion on embossing and debossing dies. For this reason, copper dies are recommended for long runs. However, this is a relative guideline since many factors determine what is even considered a long run. For example, heat is a factor that can reduce the durability of metal. Magnesium has achieved runs in the upper tens of thousands. If you are using high heat and have a long run with your embossing and debossing, brass or copper might be better choices.
Substrates
Is your paper stock recycled, heavily textured, coated, or uncoated? Generally, the tougher the paper stock, the more durable the metal for your die should be. Smoother paper stocks don’t wear as much on your embossing and debossing dies, and magnesium can yield excellent results. Copper dies may be worth the extra cost when using heavily textured papers and for longer runs.
Handling and Maintenance
Press tolerances should be checked periodically. When adjusted accordingly, you can considerably increase the life of your embossing and debossing dies. Also, be careful in make-ready. Scratching and dents can be avoided with just a little attention. With proper handling in all these areas, you will get more from your die. A good way to store your magnesium dies, is to first coat them with a little cooking spray or oil such as Pam™. When stored and handled properly you may find you are using magnesium again and again.
You’ll offer your customers the best cost, speed, and quality, when you balance all of the above factors. Paper houses have sample departments – use them to test your dies on different stock. Artwork designers should also consult with their printers and finishers concerning stock choices and designs. When printers and finishers know ahead of time what they will be working with, it is much easier for them to evaluate the best metal for your embossing and debossing job.
OWOSSO welcomes any technical questions or inquiries. Just email your job specifics including artwork design, length of run, paper stock, and temperature and we can help!
Experienced Craftsmanship
Since 1949, OWOSSO continues to set the industry standard for both craftsmanship and service. Our experienced staff has a thorough knowledge of the substrates, the die-making process, and the best production techniques that produce the highest quality dies.